- Go to the Admin Tab > click on Document Types. All of the document types and associated permissions that can be uploaded to the Student Page are stored here. You can add or delete document types, change permissions, and add the document to be viewable on the Auditor’s Page here.

-
- Academic Records
- Accounting
- Attendance
- Career Services
- Credit Transfer
- Criminal Records
- Employees
- Enrollment Packet
- Financial Aid
- Medical Records
- New Hire
- Orientation Packet
- SAP
- Scrubs Order Form
- Student Status
3. Click on the blue Add Document Type to add a new document at the bottom of the screen.

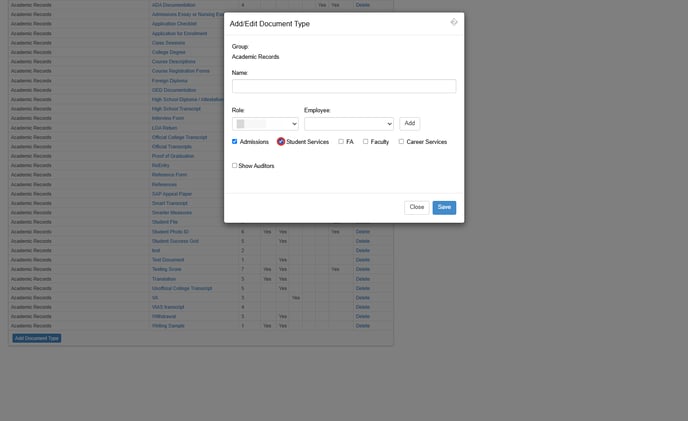
Adding a Document Type is a TWO-STEP process. First choose the departments that will have access to the document. Then add specific roles or users who will access the document.
4. Enter the Name of the document as you’d like it to display on the Student Page.
5. Choose the Departments that need access to the document type.
6. Click Save.
Selecting departments does not grant access to the document type; the user must assign roles and permissions for access. The department selection serves solely as a record-keeping tool to identify access in the document type chart.
5. Enter the Role from the drop-down list and click the white Add button. Employees of the institution are grouped into the following for document management purposes:
-
- Accounting
- Administrator
- Admissions
- Admissions Rep
- Assistant Registrar
- Career Services
- Document Manager
- Financial Aid
- Front Desk Staff
- Human Resources
- Instructor
- Program Director
- Registrar
- Student Services
6. Sometimes, it may be necessary to add individual employees to the permission level. You can select the employee name from the Employee drop-down and click the white Add button to give them permission.
7. You can also check the “Show Auditor’s” box if you want to give auditor’s access to view the document when they are reviewing student files.
8. Once you’ve entered all of the document information, click the blue Save button.